Wednesday, 16 February 2011

Post Production Evaluation of the Main Task

Overall I think I can say that the editing process is one of the most important parts of our thriller. Since it is a title sequence we need to focus especially on the integration of titles and due to the style of the sequence there is a lot of work which needs to be done in after effects.


In our post editing process of our main task we mainly used after effect to create the wished effects. Since our sequence is a title sequence, we decided to set the whole thing up as if it were a diary entry and used hand written ‘diary entries’ to create a very stylized title sequence. When we started using after effects I thought it was very difficult to use but through quite a bit of work I got my head around it and I am very pleased with the results which we have achieved so far. Compared to our preliminary task I think that we have really improved our use of skills for post production. In our preliminary task we just used final cut and tried to piece the storyboard together to make it work. For our main task we first struggled a little to get it into an order and structure which we were happy with before we blew it up to HD and put it into After Effects. We made it a little easier for ourselves because we didn’t use any people in our main task which ensured the correct continuity of certain shots, which was one thing which we struggled with in our Preliminary task. In terms of the use of final cut I think we have become quicker and a little more efficient in our working since our preliminary task and it was also easier to keep our shots the same length and speed since our subjects didn’t keep moving. We applied certain effects and transitions in Final Cut which we had no idea of when we were doing our prelim task so I think we have become more flexible in the use of final cut. 
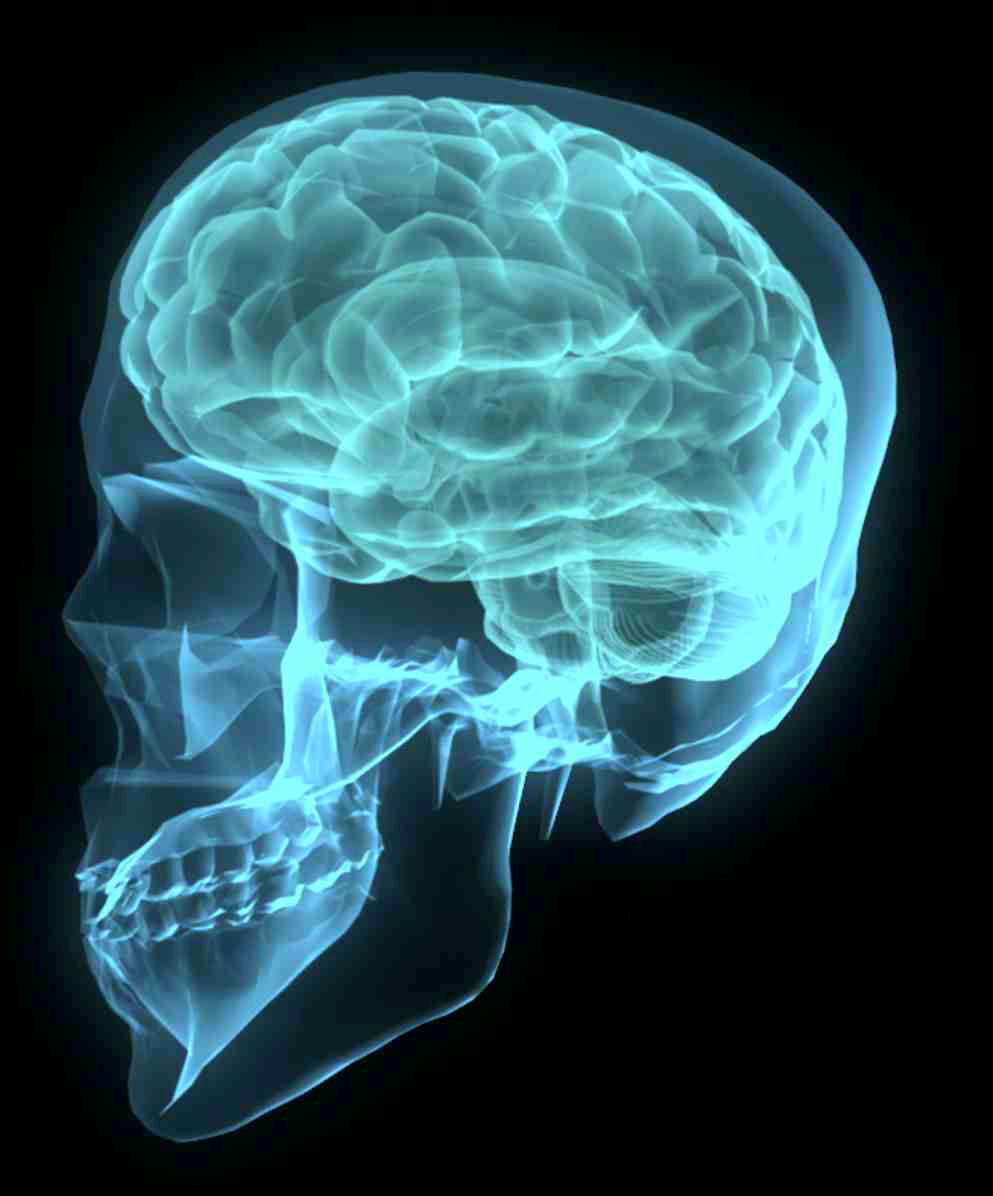
In our post production process we realized that all of our shots had a brown base colour and it all looked quite dull. Therefore we decided to stylize it by changing the hue of most of our shots going over the colour scheme from blue over purple, to red and ending up with black and white. Since this title sequence is a little journey through our characters mental state of mind and she goes crazy by the end, we decided to fit the colours accordingly. Blue is a very cool and calm colour representing a calm state of mind and very sad emotions. In our next shot we have a dark purple which represents the beginning of her depressions and anger and after that we have a red base colour which represents plain fury, fear and depression. Right at the end in our last shot we decided to make it black and white representing her losing her mind and having been tipped over the edge at the thought of aging. I think this colour scheme gave our sequence a little more depth and interesting aspects. Additionally to this we also added certain layers of writing from the ‘diary‘ and also a couple of layers of interesting paper surfaces. This created a more stylized effect and it now looks more like a title sequence as it doesn’t have a plot and we have stopped trying to make sense of everything. This new version looks a lot more interesting and it is also a proper title sequence, including all of the titles needed, integrating them in a more interesting way. I have to admit that I thought that our sequence was very boring before we put it through after effects because of its dull colour and lack of anything happening. Now that we have integrated the idea of the person having huge problems with aging and going insane under the pressure I think it could actually be the opening of a proper film. Due to its artistic nature we decided that it needed a certain style in order to make it look more professional. This was quite difficult to create for us since the base colour of all our shots was brown which made them partially quite dull. Therefore we started thinking about what we could do to make it more interesting to watch. During one of our lessons two people from our group started doing research on what reminded them of our sequence and they came up with different styles of pictures throughout. Some where medical records and scans of brains and others were edited and montaged pictures which were quite scientific, also representing the psychological link.


From these we started thinking about either making it a medical condition which is more physical than mental or making it a more psychological issue. In the end we decided that to a certain extent we could link both of those and we then also decided the structure of our sequence. This is that we have one shot and transformation with titles, then pictures of medical records, then another shot and transformation with titles, and some more mdeical records, and so on all the way through the sequence. This makes the whole sequence a bit more thematic and realistic in a way since it was quite lifeless and dull beforehand. Since it is a thematic title sequence we tried to create a certain style during our shoot and I think in terms of camera work and ideas this worked well, I do believe though that we maybe should have been more careful with the use of colour and adjusted our mise en scene accordingly.
The purpose of our title sequence is to show the audience the style of the movie and prepare them for the main part of it. There is no narrative in our opening sequence which means that the audience can't really be drawn into it. Therefore we just feed the audience examples of the main character's condition and introduce the cast and crew working for the film.


In terms of sound in our sequence we also tried to adjust the style to the pictures. The style of sound we used were ambient soundtracks, just creating a background sound for our sequence. This gives it an eerie and slightly mysterious feeling when you watch the clip. In this sequence we have in fact no diegetic sounds at all and all it depends on is the use of ambient music to set the mood. Another thing we addd to the soundtrack was talking where we recorded someone reading out our diary entries. We then layered the voices over one another creating a whisper of voices and aiming to confuse the audience in a way. So overall we have a rumble of ambient music which just forms a base for the soundtrack, over the top of that we have two or sometimes three layers at a time of a voice speaking at different levels.    


For the titles in our sequence we first thought that we would use quite ordinary titles throughout our sequence. We then decided that we would have handwritten titles instead which we did in the same way as our diary entries. We got one member of our group to write them, then I took a picture and then we edited them in after effects and photoshop to make it look better. For our titles we initially thought that we would write the names in capital letters adn the jobs in lower case writing. We then thought it looked a bit too clumsy and although people actually read the title more thoroughly when it is in capital letters we decided to highlight the names based on the size of the writing. I think our titles work really well because they fit in with the diary style of it and continued the strongly stylized feel to it the whole way through. 


Overall I think most of our sequence was created through after effects since we didn't use that much footage at all. Since our target audience are teenagers from 15-25 and people who are into arty films I think the style which we used works very well. The style is quite modern which appeals to our young target audience and it is also arty and a little abstract which appeals to the other part of our target audience. Our whole sequence is quite slow and flowing which means that we also chose to adjust the music accordingly along with the way the titles appear and disappear. The whole sequence is based on our titles since it is a title sequence and this is why we focused everything on the style of the sequence and the speed, creating a nice smooth effect and an eerie feeling.  

Tuesday, 15 February 2011

Account of Thriller Shoot Day

On the day of our media shoot, which was the 21st of January 2011, we first had to finish our set up. We started this in the afternoon of the previous day but due to an event that evening we couldn't continue. So we had to finish setting up and dressing our set in the morning of our shoot. We started this at around 8.30 am and actually started shooting around 10.00 am. Because our title sequence was thematic and we didn't use any cast, we thought that we would finish quite quickly. This turned out to be a miscalculation due to the fact that our shots were made up of close ups, and they took a long time to set up and to adjust lighting and set. For our shoot we mainly stuck to the storyboard and didn't make any big changes which was good as it enabled us to keep complete control of what we were doing.


On the day I think we were quite well prepared although we had a couple of problems beforehand. In order to collect all of our set we had to run around a lot, organising and borrowing certain things needed. When we got it all done it felt really good and gave us a certain confidence for the day. We knew the whole time what effect we were going for, which was quite a detached and arty effect, underlining the sequences we chose for our introduction. The most difficult thing about this was that sometimes we struggled to recreate the image in our heads although we managed it at the end. This is probably why we took such a long time to shoot the whole thing, since we took long to set up the shots and really be happy with the results we got.


We were going for a arty thriller which we tried to do by making everything seem atristic and enigmatic. This means that we would require a more intellectual, sophisticated audience, seeing as it is a more mind twisting plot which wouldn't be understood by smaller children.  

For our thriller introduction we decided to film completely in the studio which made it easier for us to film as our shoot was not affected by the weather. I also don't think it would have worked outside the studio as we literally just had close ups of certain things, which are being transformed in one way or another in post editing. Our piece was all about the detail and you can't see any landscapes or backgrounds behind those details so there wouldn't have been any point in filming outside. Filming inside also means that we could light the details effectively clarifying our shots and being able to focus on the right things making it easier for post editing. The studio environment also enabled us to have nice tracking shots, avoiding uneven grounds, and ridding ourselves of unnecessary aspects. 

The shots we used were all either slow tracking/panning or partially stills. This made our piece more moody and enables the viewer to see what transformation is happening on screen, underlining the titles. We encountered a problem with the way we had planned to integrate the titles in our sequence. We were originally going to do 3 dimensional titles being included in our shots, which we then found out was not possible just due to the fact that we didn't have the possibilities to do 3 dimensional titles. We can do two dimensional ones but to add the extra dimension is so much more difficult, as we would have had to 3D scan every setting which we can't do due to missing equipment for the purpose. So we had to rethink and we decided that we would only do panning/tracking/still shots which excludes the third dimension. This means that we couldn't do any arc shots which we would have liked to do for some of it. Because of the close ups which we did of our set we needed quite a lot of space to maneuver around it and not bump into anything. This was due to the fact that we had to have a focal length of at least one metre in order for the camera to be able to focus. There were certain shots which took way too long such as a tracking shots were the camera was moved at the same time as we had to pull the focus. This took about 20 takes in order to finish that part of the thriller but I think that it looks good now and it worked out well in the end. 
We also had one shot were we have a computer mouse turn into a real one and I think the shot works as we did it but I would have preferred a live mouse which wasn't possible for us to get so we had to buy a dead one. The shot would have worked better I think if we had a live mouse and a little more movement to it. Another shot we did was one where we watched an ice cube melt, which took about one hour to do but which I think will work really well if we reverse it and speed it up in our sequence. 

Our whole thriller was mainly based on the use of props and the way in which they 'transform' through a certain effect. For instance we used a fruit bowl one with good fruit and one with bad fruit and had them transform through the use of a wine bottle. In this tracking shot we wouldn't have achieved the wished effect without the use of props since we woukdnb't have had anything to film. The fruit is just one shot out of a row of different ones to make up a thematic thriller and I think it works well since you can see the protagonist's view of everything being 'Askew'. We thought quite a while about what we could use to represent this view of everything looking different to what it is and we came up that we could have something live like flowers or fruit rott to show how askew it is. I think the fruit works well because it shows the contrast between the living fruit and the dead and rotten fruit. Another way in which we used the props is when we used the light bulb to have it flicker in front of the camera and being able to integrate titles in the blackouts. This I think worked quite well because it represents the change of something - in this case his views. I do believe that we should have had the flickers for a longer period of time in order to be able to integrate the titles better but overall I really like the props we used and the shot we got.

The lighting we used was only strictly controlled lighting since we worked in the studio and had control over every single lamp such as redheads and blondes. Through the use of this artificial ligthting I think we managed to create an interesting effect to some of the shots although I believe that we should have used the lighting in a smarter way to give more depth to the shots. The problem with this would have been that the exposure would have been difficult to construct in this case and you might not have been able to see the shots clearly. Overall I think it was really helpful that we had controlled lighting as we often had to do quite a lot of takes of a shot in order to make it perfect, and the shots linking to each other such as the fruit bowl would have been disasterous if there had been a great change of lighting. 


So far we haven't made any separate sound recordings and I don't think that we will have to either, since our introduction sequence is thematic and we will propably put non diegetic sound (i.e. music) over it. Because we also only had shots which do not require a great use of sound since there is not a lot moving anyway. One of the only ones of our shots which are going to need the use of diegetic sound is probably the one of the light bulb so we can hear the flickering of the bulb below the score of the music to create a more mysterious and creepy effect. 

The role I played within our team varied throughout the day. Overall I would say I was probably what resembled the producer since I organized most of the set and everything we needed but at the same time I did mise en scene and camera. In the preparations for the shoot I found myself mainly dressing the set and collecting the props needed. On the shoot day itself I did quite a lot of camera work, which I mainly shared with one other person in our group. At one point the whole group ended up doing one tracking shot together. This was quite a difficult shot since we had to move the camera along at the sam time as pull the focus and keeping it steady. Here I pulled the focus and I made this easier for myself by sticking little pieces of sticky tape on the camera lens to mark where I had to adjust the lens to each time to get the right focus. 

I think as a group we did pretty good team work as we thought about everything rationally and worked everything out well. We made constructive suggestions and all worked really hard to get a good result at the end of the day. The fact that we all did different roles and swopped around helped us understand and learn more and enabled us to work together well and constructively.

I am quite happy with the overall material we gathered but I think that we should have improved some of the mise en scene as most of our images are earth colours, creating quite a dull mood. I think some of the shots which we got worked really well such as the fruit bowl shot. Mainly we stuck to the storyboard and altogether everything looked like it imagined it to look except for one shot where we planned to have a water drop running down the side of a glass obscurring a computer mouse as it passed turning it into a real one. This did not work out as the lens we used needed a greater focal length than we were planning to use. Overall I am happy with the material we gathered over the day although I think we would have made it easier for ourselves if we had used a different mise en scene. This would have stylized our title sequence a little more and would have made our sequence more sleek.


Thursday, 9 December 2010

planning our film Sequence


When planning our sequence we came up with many different ideas of what we could do but our whole group agreed that we wanted to do something psychological. Most of us also wanted to steer away from the typical horror conventions. Eventually we started thinking about time and once we got into this I suddenly had the idea of doing parallell worlds. All of us thought this was a really good idea and we started planning this thriller and came up with the idea of seeing the worlds split and seeing nerwspaper cutouts which would work quite well as you could develop and interesting storyline from this. I went home on the weekend and thought more about this and had the idea of Hitler's mom ice skating whilst she was pregnant and falling and losing her baby. This would be one of the points were the world splits. I also did some research on a scientist who actually proved that parallell worlds could be real.
I then came back after the weekend and found out that someone in my group thought that this was too complicated so they cnaged the idea. We are now doing something involving seeing the world differently to what it is where the protagonist sees everything very tidyly whilst in fact everything is messy and dirty. So we see the main person walk into a dark and messy room and we cut to a point of view shot where everything is clean and untouched and perfect.. We thought that we would watch him type on his computer and get the title from a word document by certain letters lighting up and moving to the side. He then walks outside and sees a couple kissing whilst they are actually fighting again showing the contrasting perception of the way he sees the world and of the way everyone else sees the world.
Some otrher ideas we came up with at thje beginning were the use of phobias so we went onto a website and wrote out all the unusual phobias which could possibvly fit and we sort of saw a pattern of numbers and weird symbols. We then did some research and found out that Jim Carey did a cinema movie which was based exactly on those themes so we had to abandon this idea and move on.

The idea which we have now stuck with is the idea of the percepted vision of the world. We will start this by having our main character walk into his office and have an establishing shot of what the world looks like, we then cut to a POV shyot and see everything tidy. He goes over and sits on his computer and we were going to use a dutch shotto see him opening the computer. Whilst he is opening we were going to include the titles subtly through him typing and printing things off. We then thought about watching him on his journey home/ to work and just having this split vision. Another poiunt we argued about was whether to have him be poor or have a high status job. We then decided that it would be best for him to have a good job to see how much he can drop in society once he goes mad just because it would be lacking storyline afterwards. We considered using dialogue but decided against it as our opening sequence would be a video montage and dialogue might just look a bit out of place. We will have non diegetic sound though I believe just because music often acts as a stimulus to create certain emotions.

One very clever opening sequence is panic room where the titles are integrated into the landscape in 3D

Wednesday, 8 December 2010

Pre-Production Planning of our sequence

Since we spent a long time planning our sequence and finding a suitable idea, we took quite long to get to the stage of actually storyboarding our piece. The story boards below show the types of shots we are going to do and what will be in those shots. Most of them are going to be close ups which means that we will not need a proper set and enough space to move around freely with the camera.


Thursday, 25 November 2010

Institution Company

Artisan Entertainment began in 1982 and did movies such as 'The Blair Witch Project', 'Novocaine' and the 'Punisher'. Originally it began as USA Home Video and turned into 'International Video Entertainment' in 1986 branching into film distribution in the late 80's. In 2003 the company announced, linked with microsoft, their firt HD DVD. In the same year Artisan was aquired by Lion's Gate and video releases from Artisan are now released under the Lion's Gate banner.


Their Filmography as 'Live Entertainment' was:
-Reservoir Dogs
-Trees Lounge
-The Arrival
-The Substitute
-Dirty Dancing
-Hotel De Love
-Critical Care
-Wishmaster
-Caught Up
-Suicide Kings

Their Filmography as Artisan Entertainment was:
-Pi
-Permanent Midnight
-Belly
-Blair Witch Project
-Grizzly Falls
-Book of Shadows- Blair Witch 2
-Requiem for a Dream
-Startup.com
-Soul Survivor
-Novocaine
-Jonah- A Veggie Tales Movie
-National Lampoon's Van Wilder
-Step into Liquid
-House of the Dead
-Dirty Dancing- Havana Nights
-The Punisher

I think that Artisan Entertainment would be good to sell 'Askew' due to the style of the movies which they did previously. They do quite arty and abstract movies which is a category which our thriller fits into and I believe that their normal audience would be our target audience. Because it is a similar style probably most of the people which have watched their previous films would come and watch this one and I also believe that they woul be prepared to risk showing this film as it is the sort of film which they show, sell and advertise. Our target audience would probably be people aged 16-24 or people which enjoy abstract films. This film might not be suitable for small children as they might not be able to deal with the subject of the film.

Wednesday, 24 November 2010

Our original Shot List:

1) Blackout with title...
2) Into panel two with man walking in medium/mid shot. Tracking shot, done twice once with good background one with bad background...
3) Blackout with title...
4) Over the head shot with hands rearranging the fruit, with hands then pulling out. Shot done again, same action but the fruit is rotten...
5) Blackout with title...
6) Straight shot, medium/mid shot of healthy flowers, then same shot done again with dead flowers...
7) Blackout with title...
8) Medium shot of printed wallpaper with frame of painting and a small table with a lamp. Shot done again with everything messed up...
9) Blackout with titles...
10) Over the shoulder shot with man looking out of a window with a tarantula on his shoulder...
11) Blackout with title...
12) Extreme close up of an eye with all the previous images flickering into the iris and pupil of the eye...
13) Blackout with main title...

Mood Board

I did this mood board to gather different ideas for my thriller. To show this I found certain images on the internet linking these pictures to ideas which sprung to my mind. I thought I would go into the direction of reflections, masks/dolls, optical illusions and strategy. This selection of pictures might help me come to a more accurate idea of what I want my opening sequence to be like.

Props List

This was the original prop list for our thriller sequence:

-Men’s suit
-Square table with cloth
-Fruit bowl with fruit
-Flower vase with flowers
-A door to be closed
-A decorated wall with, wallpaper and a cheep painting and a small coffee table with lamp
-Tarantula-Pink toed tarantula (http://www.twobytwoltd.co.uk/pages/inverts.htm)

Analysis of Opening sequence of Thrillers


Monday, 22 November 2010

What is a Thriller?

In one of our lessons we looked at the aspects of what makes up a thriller. In our terms a thriller is a movie which is designed to keep the viewer on the edge of their seats through suspenseful actions and excitement. The genre thriller is a wide genre which is defined by many different aspects. These are often things such as twisted plots, violence and gore which makes you able to split it into different kinds such as psycholgical thrillers and violent thrillers.

Twisted plots create suspense and tend to keep information from the audience up to the point at which the tension and suspense becomes unbearable for the audience. This creates the scary aspect of the thriller and often constitutes another interesting aspect to the storyline. Without tension thrillers would not have the wished effects and probably tend to become a bit dull. The stories of thrillers can very strongly. Some are supernatural, involving mystical creatures; some are scientific or medical involving a journey into the future or causing the death of a whole species whilst some are just plain scary, dealing with mental disorders and instability of the mind. One genre which can also be seen often is the spy thriller where your protagonist in a somewhat heroic way has to face the villain at the end.

Some thrillers are very intellectual adressing a very smaller audience often involving a psychological aspect whilst on the other hand some thrillers are more crude and have less of a twist which then adress a much wider audience.

Codes and Conventions of thrillers are the things which people expect to see in a thriller to make up the story line. For Example: Restricted narrative, violence, psychological twist, injuries, etc... Some of these things make up the stereotypical thriller. A tool often used to increase the tension is editing by having quick cuts and loud sounds. All of these in a way torment the audience and make them feel uncomfortable.

Wednesday, 20 October 2010

Preliminary Task Post production Blog

Before we could start editing anything, we had to access our work from the final cut server. All your work is saved in the server and ready to check out when you need to edit it. After you have finished your editing session you need to check it in again so it is saved to the server, ready for you to access it the next time. The purpose for the server is that it saves your work and it enables you to access your work at any time from any machine which is connected to that server and it makes sure you know where your work is and it therefore enables you to find your work quickly at any time and not to lose a huge piece of edited work. 


When editing your work you need to make sure that the continuity of your project works so that the audience can keep their orientation and does not get confused. It is also crucial to ensure that all the continuity works when you shoot your film, to make it easier for the editor. For example when we did our preliminary task post production we noticed that one of our actors had his hands swinging in one shot and in the next he suddenly had one hand in his pocket. We kept telling him to do the same thing every time he acted it, during the shooting, but I guess it was our responsibility to ensure continuity and we should have checked this more carefully to make it easier for our editing process. To ensure that this could not be seen by the audience we had to vary the shots and cut a couple more shots in to cover it up.


When we started editing we first viewed all of our material and organised it into the 'Rushes Bin'- this is all your raw footage (i.e. a backup copy)- and the 'Log Bin'- this is a bin in which you put all the material which you like and which you might be able to put into your video. This makes the whole editing process a lot faster and it helps you to use your time effectively, so you can focus on how you are going to be able to piece it together. When we were editing we viewed all our material and we noticed that all the shots from one set up were unfocused and therefore we had to re plan in a way that we would be able to produce a good piece of work without that shot. Also as you put you material into the 'Log Bin' you rename it to make it easier for you to find it quickly as you are editing the movie. I found this very helpful because it enabled us to make quick decisions and then move on rather than having to search for one shot for ages. 

First we started by putting all our shots together so that they were as close as possible to the storyboard and after we were happy with that, we went over the whole thing again and tried to put in different shots to make it more effective and give it an interesting spin. For some of these shots we needed to do sound bridges so that we could use one image to work with a different sound to its original sound. We did this when we wanted to show our actress playing with the Rubik's cube, and show her hands in a close up whilst the other actor was saying something to her which did not fit in with the point at which we filmed the close up of her hands. We also tried to put all our shots together to make sense, effectively always looking at our continuity and making sure that the audience knows what the space looks like, which is why we need an establishing shot. We disobeyed this very common rule by having our first shot of our actor's shoes walking into the room, then leading to the establishing shot which was therefore a bit delayed.

Wednesday, 13 October 2010

Preliminary Task Evaluation

For our preliminary task everyone in our group got assigned a room to film their scene in their groups. My group got assigned the editing suite to film our preliminary task. I thought this location worked alright for our task although it was difficult to find a good angle to be able to include the actors’ feet in the wide shot whilst avoiding to see anything but the white wall which we were filming in front of. Therefore we ended up having to use other parts of the room such as the TV’s and desks in the background especially when we were doing over the shoulder shots and close ups.


Whilst shooting our scene all of us were responsible for pretty much everything. One person was operating the camera but still everyone else in the group was choosing the frames and helping him assure that everything (i.e. Focus, exposure, white balance, etc.) was levelled correctly to get the best possible images. I personally was thinking a lot about continuity and with the help of all the other people in the group we were deciding on shots and focus points to enhance our scene.


Lighting:
The lighting in our scene was very basic as we just used the normal overhead lights in the editing suite. This made our scene look very clinical, making the viewer focus on the actors rather than the setting. This use of lighting ensured that both of the actor’s faces were seen clearly and therefore the camera could see their facial expressions and emotions. I think this use of lighting was effective because as the viewer you could then see the Rubik’s Cube being handed over clearly without having to think hard about what it is. This made the scene easier to understand and also easier to watch altogether.


Filming:
When we set up our camera we watched out for getting the right white balance- to ensure that all the colours in the room look normal and in proportion and also to make sure that there aren’t any continuity mistakes in terms of lighting and colour-, we watched out for getting the correct exposure- i.e. not having any areas in the image which were overexposed or underexposed by adjusting the aperture of the camera- and we also tried to make sure that we got a good focus for every shot. This just make the whole scene look professional although I did notice that we did not manage to get the focus right on some of our frames which we only noticed once we viewed the material.
As we were filming inside it was not too difficult to ensure that the tripod was level each time but we still tried to check before each shot, to make the whole task look a bit more professional and skilled. Every time after we changed our position we ‘Bubbled’ the tripod, making sure that everything was levelled.
With every shot we tried to remember to use the rule of thirds and put your main focal point of centre, to make sure that the type of shot (i.e. close ups, over the shoulder shots, wide shots, etc.) were set up correctly and that nothing was seen on the image which was not supposed to be there, and also that we made sure we followed the 180 degree rule so the whole scene made sense.
Our entire group was responsible for continuity and therefore we all made sure that nothing was in the frame which was not supposed to be there, such as camera bags or lighting equipments which made our scene look more professional. We checked each time that nothing was in the background which should not have been there.
As we were filming in the editing suite we were forced to adjust our angle of camera to ensure that the background was mainly the white wall, to make the actors stand out and to have the viewer focus on the actors rather than on the setting. For some of the close ups we had to adjust our angles to conform the rule of thirds and therefore have a nicer image composition.

Sunday, 10 October 2010

Storyboarding

What are they and what are they used for?
Storyboards are graphic illustrations of what your film sequence will look like. This helps you to organize and visualize what your film will be like. It also enables you to do a shotlist for the shoot which then helps you to keep an overall look over what has been done and what still needs to be done. Storyboards hepl greatly on set as well. They enable actors to know what they are doing, set designers to know what's in the shot and what isn't and it enables the technical team to set up more quickly as they already know what they are doing.

How to do it?
Some people believe that they need to be really good at drawing in order to be able to do this. That isn't true. If you can't draw you can either just draw absolutely necessary aspects or you could photograph mannequins, arranged to fit the set up of your scene. As the pictures are still it is difficult to show the actors' movements or any camera movement. This is often solved with the use of arrows to represent any movement going on in that shot. Since the storyboard just needs to enable you to drop your ideas down on paper, keep it small and don't use a lot of space. Also label your shots which makes it easier to refer to specific ones on set.

Wednesday, 6 October 2010

Introduction to Video Camera


Before you can start shooting a frame you need to adjust certain camera setting such as the white balance, aperture settings, focusing and shutter speed. All of these settings affect the picture of the shot making it lighter and more focused. The white balance adjusts the colour proportions of the picture making the white actually seem white rather than blue or slightly orange. To adjust the white balance you have someone stand in front of the camera with either a white board or just a white piece of paper, then the camera operator focuses on the white piece of paper and does the white balance. On the school cameras this is done by pressing the ‘white balance’ button whilst on other cameras this is done by actually manually controlling the white balance and adjusting it until every colour looks right. The aperture adjustments are made by adjusting a wheel at the front of the camera. The aperture affects the amount of light entering the lens by opening up to a certain size every time an image is taken- this happens 25 times in one second. To focus the image on the school cameras you put everything in their positions, you then zoom in to a certain object/subject and focus on their eyes (if it is a person/animal/etc.) by adjusting the wheel at the front of the camera, you then zoom back out to adjust your frame in a way that you want it for your frame. The time code of the camera is determined by how many hours, minutes, seconds, frames you have already shot (Hours:Minutes:Seconds:Frames- 01:46:31:12) giving every frame a unique time code on that role of film. The viewfinder of the camera is the part of the camera which you look through to find your frame for a shot.
When you set up your tripod you need to make sure it stands securely as not to damage camera or tripod, you then secure the camera to the tripod. To assure that the frame is straight you need to bubble your tripod, you do this with the help of a water scale where you try to adjust it in a way that the bubble ends up in the circle of the water scale. This assures that your frame is not tilted to any sides, in some cases making sure that the horizon is straight. You also need to adjust the height of the tripod to achieve different effects such as the hero shot or making characters seem more vulnerable, by shooting from slightly above. If you do an over the shoulder shot the camera should be on eye level with the person on screen. The advantage of using a tripod rather than making it handheld is that your image is a lot steadier and that your video looks much more professional than if you did it handheld unless you want to achieve an effect of the characters viewpoint when running (eg:blair witch project).    

Different Camera shot types include:
Extreme Wide shot:                            Extreme Close up:
       
Mid Shot:                                   
                                                                    Two Shot:

 Over the shoulder Shot:                                 Point of view shot:
                           

Medium close up:                                       Cut Away:
   

Weather Shot:


To make frames in these shot types look nice you neednto remember the rule of thirds. This is a rule which determines the spatial placement of objects in your frame. If you split your frame up into 3rds diagonally and horizontally you get different areas of the image. The points of intersection are the so called 'hot spots'. These are the areas of any frame/image which we look at first as soon as we see it. So it is normal for the focal points of the frame to be on those hotspots to make the image easy on the eye. Some pictures work well if only certain areas of the frame are taken up by the focal point, so if a third is taken up by the floor and a third is taken up by the sky the image composure should work well. You would also want to avoid putting your focal point right in the centre of the image because it almost never looks good.

izzyvideo110pic.jpghere his eye is on a hot spot and he is taking up two thirds of the frame which makes a nice image composure and works well together. 

Another important factor which includes the use of camera and editing is 'continuity editing' This ensures that the viewer understands the story line of a film and that there are no moments when the viewer remembers that they are watching a movie at the moment because of bad editing or continuity problems. Continuity editing is made up of two main factors- spatial continuity and temporal continuity. Temporal continuity is best preserved by avoiding any strong changes in light after a cut and by making sure that nothing changes back after it has already happened. So if in a fight scene for instance someone gets punched and breaks their nose and you see the blood flowing to the chin, you need to make sure that in the next frame the blood is in the same place, so it isn't further up or down as it might temporarily throw the audience and confuse them. Another way to preserve temporal continuity is not to break the ellipsis- this is a break in the natural time as portrayed by the editing of the film. As the editor you also need to make sure that the diegetic sound matches the action on screen in order for all of it to make sense. Sometimes video montage is used to portray the passing of long periods of time. Matching on action is also important- this is that as the editor you need to make sure that after a change of frame the action is picked up just where it left off in the previous frame. Another rule you should remember when shooting a scene is the 180° rule. Here you need to make sure that if two characters are having a conversation, the camera doesn't go any further around them than 180°.


180_degree_rule.png

In our preliminary task which we did in our lesson we had to shoot a certain scene. During our shoot I think we worked quite well together and did not make a lot of mistakes. I think we need to listen to one another more and bring in our own ideas whilst listening to other just as much. I also think we need to discuss with the whole group before we do anything, such as move anything in order to make t look nicer, without considering continuity. 

In order for everyone on set to know what to do you need certain key terms so no one gets confused. These are:
Stand by/Standing by- the director shouts this when he/she wants everyone to get into their places and get ready for filming.
Turn over/Turning over- this means that the Camera and sound are getting turned on which is crucial for any kind of recording.
Action- at the beginning of a take the director shouts this to let everyone know when to start acting
Cut- This is shouted at the end of a scene and it is a signal for the camera and sound to be turned of and for the actors to relax.

The difference between still pictures and videos is that when you video someone you see everything they do and you can see everything that is happening whilst when taking photographs you just have a period of time which ranges from 1/8000 of a second to 30 seconds (depending on your choice and use of exposure) in which you can see what is going on after you have switched off the camera. I personally love both kinds of devices as they both have their charm. Videoing someone is just as much of an art as taking a photograph of someone and make it look professional. So therefore I would say that I loved the change to video camera as much as I loved the first time I tried out my photography camera. I think it is difficult to say which I prefer as both are very different.


Wednesday, 29 September 2010

Introduction to Photoshop

Adobe Photoshop is a graphic and picture editing tool. It enables the user to alter, manipulate and create images either from existing photos or found images.

The tools I found effective were:

One of the tools we learnt to use in our photoshop introduction is the 'Marquee Tool'. This is used to select an area of an image to then be able to copy that area, change the colour of just that area or cutting out that area.

Another useful selection tool is the lasso tool which has three different settings- magnetic, polygonal and lasso- all of these help you select an area of an image you want to edit, montage or manipulate.

A further selection tool is the magic wand tool which selects an area of the image which is the same colour as a pixel you just selected and which is connected to it. So it works best when it is used on some sort of pattern which has very simple colours.

A further useful tool is the crop tool which can be used to cut out only a certain area of an image or sometimes even if a picture is slightly out of perspective. If there is a picture which is out of perspective, you can change it so the ppixels stretch out and put it in perspective.

One tool which is easily used for editing is the brush tool which enables you to paint certain things with a variation of different brushes and brush sizes. This can sometimes add a nice effect to certain posters and make them more creative and colourful.
I found most of these tools helpful to improve and edit the pictures. Sometimes I found it a bit challenging to cut out certain things with the lasso tool because it is difficult to make the edges look smooth and cut the image precisely. I also often make the mistake of turning the exposure for the burn tool up too high which resulted the picture to be too light or too dark and it just looked less realistic and out of place.


We use the clone stamp tool to copy areas of the pictures onto another area of the image and therefore connect montages and make them look more realistic and less out of  place.

The burn tool can be used to darken certain areas of the image selectively and manually. At the same time it can be used to desaturate certain images of the picture or lighten them up- which is normally used for eye whites or teeth.

A similar tool to this is the blur/smudge/sharpen tool which does exactly that to certain areas of the picture. This tool can also help you to make a montage more realistic and make it look in place.

Wednesday, 22 September 2010

Basic Stills Camera work and Composition

Composition:
Photography brings a visual language that is universal in understanding. We must then understand its vocabulary which consists of shapes, textures, patterns, lines, colours, shade of light to dark and sharp to blurry images. Just as we must learn to arrange words in a coherent order in order to make sense when we write or speak, so too must we put visual elements together in an organized manner if our photographs are to convey their meaning clearly and vividly.
Composition means arrangement: the orderly putting together of parts to make a unified whole; composition through a personal, intuitive act. However, there are basic principles that govern the way visual elements behave and interact when you combine them inside the four borders of a photograph. Once we have sharpened our vision and grasped these basic ideas of principles, then we will have the potential for making our photographs more exciting and effective than ever before.

The Rule of Thirds
If you divide a picture into thirds (vertically and horizontally) with imaginary lines you get the base for the rule of thirds. The interceptions of these imaginary lines are the so called 'hot spots'. This rule helps you divide the picture into certain areas which can be used to compose a balanced easy on the eye picture. It avoids the creation of unproportional pictures which are difficult to understand for the viewer. 

Introduction to Media Studies

This year in media studies we will be doing a preliminary task and one main task which will be an introduction for a thriller. I am really looking forward to the syllabus this year and I think it will be good practise for the future as I'm planning to go to film school. I hope I will improve my knowledge on camera work and directing in order to get to know the business a little better and be able to understand the professional work. I have always been interested in camera and one of my other subjects is photography which also helps me to improve my understanding of this.

Doctor Who Trailer